Showing Your First Sprite
In the previous chapter, we set up the Strawberry project and opened an empty cornflower-blue window. That window is the canvas — now it is time to actually paint something on it. In this chapter, we will render our first sprite: a small strawberry image placed in the center of the screen.
By the end of this guide, your game will display a single strawberry image on top of the blue background. Along the way, you will learn what sprites are, why Strawberry uses texture atlases instead of raw PNG files, how to generate atlases with the Atlas Generator tool, and how to load and draw a sprite from code.
1. What Is a Sprite?
A sprite is a single 2D image used by your game to represent a visual element on screen. The player character in a platformer, an enemy, a bullet, a tree on the background, a UI icon — all of these are typically sprites. Conceptually, a sprite is just a rectangular region of pixels that the engine copies onto the screen at a specific position, scale, and rotation every frame.
What makes a sprite more than just an image file is that the engine treats it as a first-class object. A sprite in Strawberry carries metadata along with the pixels themselves:
- A name (so you can look it up from code, e.g.
"Strawberry") - A position inside the source texture (where the sprite begins)
- A size (width and height in pixels)
- An optional frame map for animated sprites (a list of sub-rectangles that together form a walking cycle, an explosion, etc.)
When you say sprite.Sprite = Sprites["Strawberry"], you are not loading a file from disk at that moment — you are grabbing a strongly-typed sprite descriptor that was already parsed and indexed when the game started. The GPU texture is already uploaded, the frame map is already computed, and the only thing left for the renderer to do is draw the right rectangle on the screen.
This is why sprites in Strawberry are not just "PNG files loaded with Texture.FromFile()". They are higher-level objects that bundle pixel data, layout information, and optional animation data into a single asset that the engine understands natively.
2. Why We Cannot Use a PNG File Directly
If you have ever written a small game or followed a beginner tutorial, you have probably seen code like Texture2D tex = LoadPNG("player.png"). It works, it is simple, and for a single image it is perfectly fine. So why does Strawberry forbid this pattern and require an intermediate format called an atlas?
The answer comes down to how modern GPUs actually work.
2.1 The GPU Texture-Switching Problem
Every time the GPU is asked to sample from a different texture, the graphics pipeline has to perform a texture binding operation. Binding is not free — it flushes part of the pipeline, can invalidate caches, and on some mobile and WebAssembly backends it is dramatically more expensive than on desktop GPUs. If your scene contains 200 different sprites, each coming from its own PNG file, the renderer has to perform 200 texture bindings per frame. That is a lot of wasted time.
A texture atlas solves this problem by packing many sprites into a single, larger texture. The renderer binds the atlas once and then draws sprite after sprite from different sub-rectangles of the same texture. The number of bindings drops from "one per sprite" to "one per atlas", which can easily be a 10× to 100× speedup on scenes with many small sprites.
2.2 Memory and Power-of-Two Constraints
GPUs historically require texture dimensions to be powers of two (64×64, 128×128, 256×256, …). Even on modern hardware that supports non-power-of-two textures, the driver internally pads and aligns them, which means uploading many small, oddly-sized PNGs wastes memory and breaks alignment. Atlases are built with proper power-of-two dimensions from the start, so there is no hidden padding cost.
2.3 Bandwidth and Loading Time
Loading a thousand tiny PNG files from disk is much slower than loading a single large atlas file. Each file open, read, and PNG decode carries overhead. With an atlas, you open one file, decode one image, and immediately have access to every sprite inside it. This is especially important on Android and WebAssembly, where file I/O is significantly slower than on desktop.
2.4 Strawberry's Native Format
Strawberry takes the atlas idea one step further and stores it in its own native format rather than relying on raw PNG atlases. An atlas in Strawberry consists of two files:
| File | Extension | Purpose |
|---|---|---|
| Texture file | atlas.sbTex |
A pre-decoded, GPU-ready texture in Strawberry's internal format. No PNG decoding happens at runtime. |
| Sprite list file | atlas.sprList |
A text/binary manifest that lists every sprite inside the texture: its name, position, size, and frame layout. |
When you call Sprites.LoadSprites(this, "atlas.sbTex", "atlas.sprList"), the engine reads the manifest, indexes every sprite by name, and uploads the texture to the GPU exactly once. From that point on, looking up a sprite by name is essentially free.
In short: PNGs are great for editing in tools like Aseprite or Photoshop, but they are terrible for runtime rendering. Strawberry's atlas format is the bridge between "easy to edit" and "fast to render."
3. The Atlas Generator Tool
Building atlases by hand is tedious. You would have to pack sprites, compute their sub-rectangles, write the manifest file, and export a texture — for every change. Strawberry ships a small dedicated tool called Atlas Generator that does all of this for you.
Download link: Atlas Generator is available on the Strawberry tools page: https://sb-engine.ir/tools
The Atlas Generator is a standalone desktop application with a dark, three-panel interface:
- Left panel — Sprites List: the list of PNG files you have added to the atlas.
- Center panel — Canvas: a live preview of the packed atlas, with zoom controls.
- Right panel — Properties: atlas size, utilization percentage, sprite count, border width, and information about the currently selected sprite.
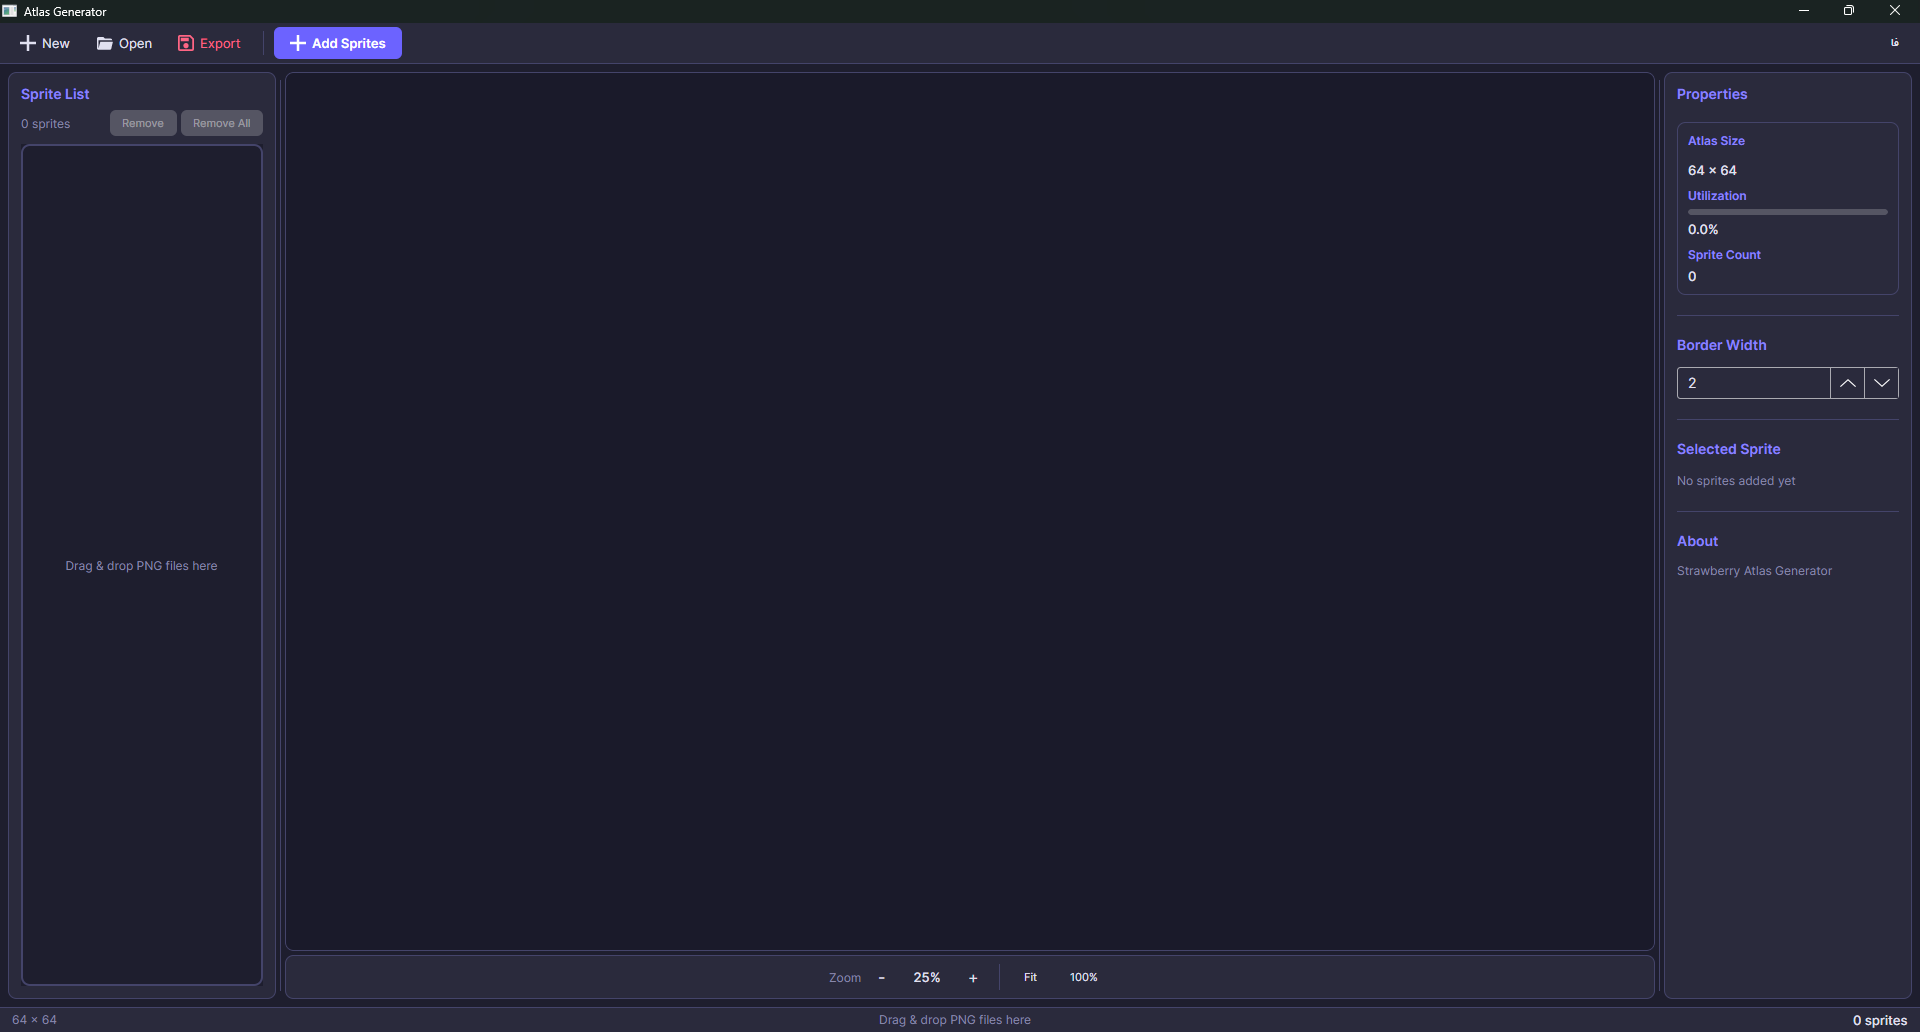
The screenshot above shows the tool right after launching it, with no sprites imported yet. The center canvas invites you to drag & drop PNG files onto it, and the right panel reports an atlas size of 64 × 64 with 0.0% utilization.
3.1 Adding Sprites
Click the purple Add Sprites button in the top toolbar (or simply drag and drop PNG files onto the canvas). The tool accepts any number of PNG files in a single batch. Once added, every sprite appears in the left panel with its name, its frame count, and its pixel dimensions.
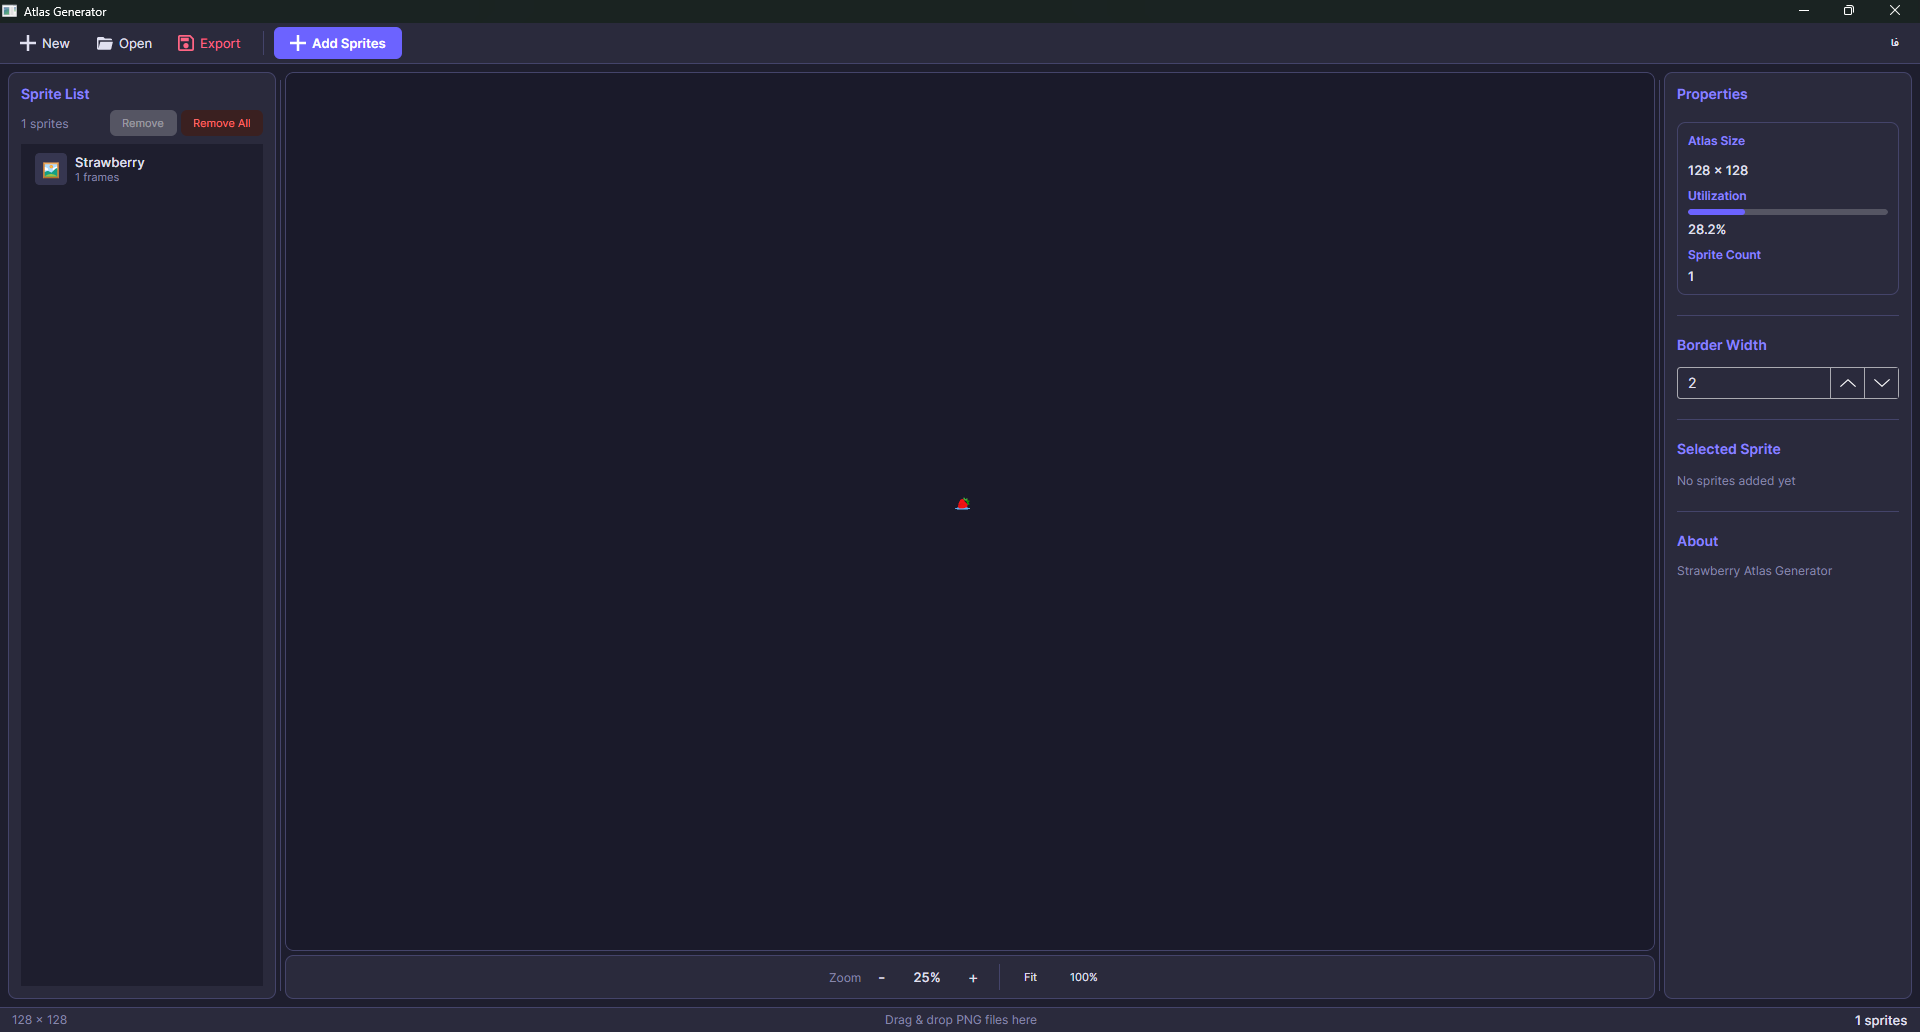
In this second screenshot, we have added a single PNG file named Strawberry.png. Notice how the right panel immediately updates:
- Atlas Size grew automatically from 64 × 64 to 128 × 128 (the tool picks the smallest power-of-two size that fits everything).
- Utilization is now 28.2%, telling us how much of the atlas texture is actually filled with sprite pixels.
- Sprite Count is 1.
- The sprite entry in the left panel shows the name
Strawberryand1 frames, meaning this sprite has a single frame (it is a static image, not an animation).
3.2 Sprite Sheets and Automatic Frame Maps
Real games rarely use static sprites — characters walk, enemies explode, projectiles spin. These animations are usually authored as sprite sheets: a single PNG file that contains several frames laid out horizontally (or in a grid).
The Atlas Generator recognizes sprite sheets automatically based on their file name. If your PNG file is named with the pattern
<name>_strip#.png
where # is the number of frames, the tool will:
- Load the PNG.
- Split it horizontally into
#equal-sized frames. - Build an internal frame map for that sprite.
- Pack every frame into the atlas as if they were individual sprites, but keep them grouped under the same sprite name.
For example, a file named player_walk_strip8.png would be interpreted as an 8-frame walking animation. When you later ask for Sprites["player_walk"], Strawberry will give you back a sprite object that knows about all 8 frames, and you can switch between them by frame index.
If your file does not match the _strip# pattern (like our Strawberry.png), the tool treats it as a single-frame sprite, which is exactly what we want for this guide.
3.3 Configuring the Atlas
Before exporting, you can tweak a few options in the right panel:
- Border Width — the number of transparent pixels left between adjacent sprites in the atlas. This prevents texture bleeding (where pixels from one sprite leak into a neighbor due to floating-point sampling). The default value of
2is a good starting point. - Atlas Size — normally left on "auto", but you can force a specific power-of-two size if you want to reserve room for future sprites.
You generally do not need to touch these for our first sprite — the defaults are fine.
3.4 Exporting
Click the red Export button in the top toolbar. The tool writes two files into the directory you choose:
atlas.sbTex       # GPU-ready texture (Strawberry's native format)
atlas.sprList     # Sprite manifest (positions, sizes, frames)
Both files must travel together — the texture is meaningless without the manifest, and the manifest references a texture that must exist on disk. In the next section, we will load both of them from our game.
4. Required Assets
Before we write code, you need two things:
- The Atlas Generator tool, downloadable from https://sb-engine.ir/tools.
- The Strawberry.png image to feed into the tool.
To make this easy, we have packaged the Strawberry.png file (a 64 × 64 transparent PNG of a small strawberry) into a zip archive you can download and extract directly:
Download assets: Strawberry.zip — contains
Strawberry.png(64 × 64, RGBA, transparent background).
Once you have both:
Launch Atlas Generator.
Drag
Strawberry.pngonto the canvas (or click Add Sprites).Verify that the left panel shows
Strawberrywith1 framesand the right panel shows128 × 128at ~28% utilization.Click Export and save the two output files (
atlas.sbTexandatlas.sprList) into a folder calledAssets/inside yourMyFirstGame.Desktopproject. Make sure both files are copied to the output directory on build (set their "Copy to Output Directory" property to "Copy if newer" in your IDE, or add the following to yourMyFirstGame.Desktop.csproj):<ItemGroup> <None Update="Assets\atlas.sbTex"> <CopyToOutputDirectory>PreserveNewest</CopyToOutputDirectory> </None> <None Update="Assets\atlas.sprList"> <CopyToOutputDirectory>PreserveNewest</CopyToOutputDirectory> </None> </ItemGroup>
5. Loading the Atlas and Rendering the Sprite
Now we extend the MyGameContext we wrote in the previous chapter. Open MyGameContext.cs and modify it as follows. The new lines are commented with // NEW so you can spot them at a glance.
using Strawberry.Components;
using Strawberry.Core;
using Strawberry.Graphics;
using Strawberry.Graphics.Layers;          // NEW — for SpriteLayer
using Strawberry.Graphics.ParticleSystem;
using Strawberry.Graphics.Text;
using Strawberry.Math;
using Strawberry.Sound;
using Color = Strawberry.Graphics.Color;

namespace Strawberry.Test
{
    public class MyGameContext : StdGameContext
    {
        public const float ppm = 32f;

        public AtlasHelper Sprites;          // NEW — holds our loaded atlas

        public MyGameContext()
            : base(1280, 720)
        {
        }

        public override void OnInitialize(IGameLauncher laucnher)
        {
            base.OnInitialize(laucnher);

            var size = GraphicsContext.GetScreenSize();
            Viewport viewport = new Viewport(
                "Default",
                new Vector2(),
                size,
                new Vector2(),
                new Vector2(1280, 720));

            Scene scene = new Scene("Main", 1280, 720);
            scene.ClearColor = Color.CornflowerBlue;

            // NEW — create a sprite layer and register it with the scene
            var spriteLayer = new SpriteLayer();
            scene.AddLayer("Sprite1", spriteLayer);

            // NEW — load the atlas (texture + sprite list) from disk
            Sprites = new AtlasHelper();
            Sprites.LoadSprites(this, "atlas.sbTex", "atlas.sprList");

            // NEW — create an entity, give it a transform and a sprite,
            //       and bind the sprite to the layer we just created
            Entity entity = new Entity();
            entity.Initialize("first_entity", scene);

            var transform = entity.AddComponent<TransformComponent>();
            transform.Position = new Vector2(Scene.Width / 2, Scene.Height / 2);
            transform.Origin = Sprites["Strawberry"].Size / 2;

            var sprite = entity.AddComponent<SpriteComponent>();
            sprite.Sprite = Sprites["Strawberry"];
            sprite.Layer = spriteLayer;

            AddScene(scene);
            SetScene("Main");

            scene.Viewports[0] = viewport;
        }
    }
}
5.1 Code Walkthrough
Let's go through every new block and explain what it does.
5.1.1 The using directive for layers
using Strawberry.Graphics.Layers;
The SpriteLayer class lives in the Strawberry.Graphics.Layers namespace. Without this using, the compiler would not be able to resolve SpriteLayer later in the file.
5.1.2 The Sprites field
public AtlasHelper Sprites;
AtlasHelper is the engine's high-level interface to a loaded atlas. Once LoadSprites has been called, this object behaves like a dictionary: you can index into it by name (Sprites["Strawberry"]) and get back a fully-resolved Sprite object. We keep it as a field (rather than a local variable) because other parts of the game — for example, code that spawns new entities later — will want to look sprites up by name too.
5.1.3 Creating and registering a sprite layer
var spriteLayer = new SpriteLayer();
scene.AddLayer("Sprite1", spriteLayer);
A layer in Strawberry is a render group. Every frame, the engine iterates through the scene's layers in order and draws whatever sprites belong to each layer. This lets you control draw order independently of entity creation order: a BackgroundLayer is always drawn first, a SpriteLayer for game objects comes next, and a ParticleLayer for sparks and smoke goes on top.
Here we create a SpriteLayer, name it "Sprite1", and add it to the scene. Any sprite whose Layer property is set to spriteLayer will be drawn through this layer.
5.1.4 Loading the atlas
Sprites = new AtlasHelper();
Sprites.LoadSprites(this, "atlas.sbTex", "atlas.sprList");
LoadSprites takes three arguments:
| Argument | Value | Meaning |
|---|---|---|
this |
the game context | Gives the atlas helper access to the graphics context and asset storage. |
"atlas.sbTex" |
texture file | The GPU-ready texture produced by Atlas Generator. |
"atlas.sprList" |
sprite list file | The manifest that tells the engine where each sprite lives inside the texture. |
After this call returns, Sprites["Strawberry"] is immediately usable. The texture has been uploaded to the GPU, and every sprite defined in the manifest has been indexed by name.
5.1.5 Creating the entity
Entity entity = new Entity();
entity.Initialize("first_entity", scene);
In Strawberry, an entity is a generic container for components. It has no behavior of its own — it is just a bag of components. The Initialize call registers the entity with the given scene and assigns it a name ("first_entity") that you can use later for debugging or lookups.
5.1.6 The Transform component
var transform = entity.AddComponent<TransformComponent>();
transform.Position = new Vector2(Scene.Width / 2, Scene.Height / 2);
transform.Origin = Sprites["Strawberry"].Size / 2;
TransformComponent is the component that defines where the entity lives in 2D space. Three properties matter most:
Position— the entity's world-space coordinates. We set it to the center of the scene (Scene.Width / 2,Scene.Height / 2), which is the middle of our 1280 × 720 virtual resolution.Origin— the pivot point of the entity, measured in pixels from the top-left corner of the sprite. By dividing the sprite's size in half, we place the pivot at the center of the image, which means the sprite will be centered on itsPositionrather than drawn from its top-left corner outward.
Without setting the origin, the strawberry would appear in the lower-right quadrant of the screen, because its top-left corner would sit at the scene's center. Setting the origin to Size / 2 is the standard trick for "center this sprite on its position".
5.1.7 The Sprite component
var sprite = entity.AddComponent<SpriteComponent>();
sprite.Sprite = Sprites["Strawberry"];
sprite.Layer = spriteLayer;
SpriteComponent is what actually makes the entity visible. Three things happen here:
- We add the component to the entity (the same way we added
TransformComponent). - We assign the sprite object we want to draw — in this case, the one named
"Strawberry"from our freshly loaded atlas. - We bind the sprite to the
spriteLayerwe created earlier. From now on, every time the layer is drawn, this sprite will be rendered.
Notice that we never wrote a draw call ourselves. Strawberry's renderer walks the scene's layers automatically every frame and asks each layer to draw its sprites. All we had to do was declare what to draw and where; the engine handles the rest.
6. Running the Game
Run the project exactly as before:
dotnet run --project MyFirstGame.Desktop
If everything is wired up correctly, you should see the cornflower blue window from the previous chapter — but this time, a small strawberry image is rendered exactly in the center of the screen.
If the game compiles but the strawberry does not appear, the most common culprits are:
- The atlas files are not in the output directory. Make sure
atlas.sbTexandatlas.sprListare copied to the build output (see the.csprojsnippet in section 4). - The sprite name does not match.
Sprites["Strawberry"]is case-sensitive and must exactly match the sprite's name as shown in the Atlas Generator's left panel (which, by default, is the PNG file name without extension). - The sprite layer was not added before the entity was created. Layers belong to the scene, and the scene must know about a layer before sprites can be assigned to it.
7. What's Next?
You now have a working pipeline from raw PNG file → atlas → engine → screen. The same workflow scales to hundreds of sprites: drop them all into Atlas Generator, export one (or several) atlases, load them at startup, and reference every sprite by name.
In the next chapter, we will build on this foundation and look at how to animate a sprite by switching between the frames of a sprite sheet — the feature that the _strip#.png naming convention in Atlas Generator was designed for.